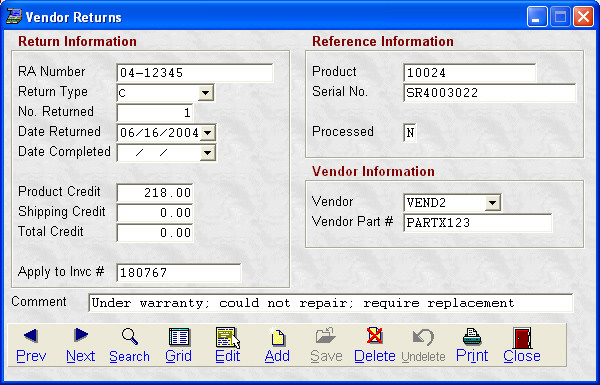
Available from many places including Customer, Inventory, Employee
and Vendor, Toolbars appear at the bottom of the screen and provide access to a
variety of functions. To activate a function, click on the desired item.
Alternatively, to use your keyboard, you may press [Alt]+Letter, or simply the
underlined letter by itself. The exception to this is the Save button. You may
not press the S by itself; instead, you may use [PgDn].
Will print out the RA form.
This lets you know if the RA has been processed or not.
A value of N means it has not been processed. A value of Y means it has been
processed.
This is your ID of the product you are returning.
This is the vendor ID and part number for the item being returned.
This is the date when the RA was finalized. It will fill
in for you automatically when you finalize the RA.
This is the date your returned the items to the vendor.
It will automatically fill in for you when you process the RA.
This is a comment that will print out on the RA form in which
you can briefly describe why you are returning the item.
If you are returning the item for credit, this is the vendor invoice
number you want the credit applied to.
This is the grand total of the credit you will receive for the
product and shipping charges.
If your vendor will give you credit for the shipping charges you
paid when you received the item, enter the amount of that credit here.
If you are returning for credit, this is the amount of credit
you will receive for the item itself, less shipping or restocking fees. This
field will default to what you paid for the item, but may be changed if necessary
to accommodate a restocking fee or other increase or decrease in the amount of
the credit.
If the item is a serialized item, this is the specific number
of the item being returned.
The number of items being returned on this RA.
NOTE: If the item is serialized, you
can only have one item per RA. Should you need to return more than 1, add
a separate RA for each of them and if your vendor gave you a single RA number,
simply add a suffix to the number.
You can choose to Exchange the item or return it for Credit.
The RA number for this return (typically assigned to you by your
vendor.
Closes the screen you are on.
Unflags a record previously marked for deletion. (The button
is only active on a record currently marked for deletion.)
Flags the current record for deletion.
Saves a newly added or edited record. (The button is only
active when you are adding or editing records.) You can also press [PgDn]
to save any record.
If
the item is serialized, you will be asked to enter the serial number you are returning.
Type in the serial number and press [Enter].
Non-Serialized Item
If
the item is not serialized, you will then see a grid list of all of your purchase
orders. Highlight the PO that you purchased the item on and click Ok.
Type in the RA number
(typically assigned by your vendor), whether you are returning for credit or exchange,
the number being returned (can ONLY be 1 if you are returning a serialized item),
the product and shipping credit if applicable, and any comment. Much of your
vendor information will automatically be filled in for you based on either the
PO information or the serial number information, but it may be changed if necessary.
Select Save to
save your changes. The RA is now saved, but it is not yet Processed
or Finalized.
Edit the record on screen.
Calls up a grid view.
Calls up a search box used to locate records.
Takes you to the next record.
Takes you to the previous record.
(Click on any field below for context-sensitive help)