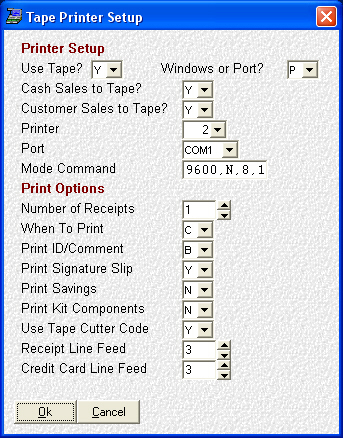
If your printer is attached to a COM port, you must enter the mode command here. Consult the user's manual for your printer for the correct mode command
Select or click Ok to exit and save, or Cancel to
exit without saving.
Click on the
to access a grid selection of available tape printers. Select your printer
from the list. (If you are using the Windows print system, you ONLY need to select
this option if you are using a printer with an auto cutter.)
Here you may set various print options such as whether or not
to print the product ID, whether or not to print savings, the number of line feeds
at the end of the receipt, etc.
Enter or select the port your tape printer is attached to.
To have your customer sales print to tape, set this to Y; to have
them print to a standard invoice set it to N.
To have your cash (non-customer) sales print to tape, set this
to Y; to have them print to a standard invoice set it to N.
This field lets you choose between attaching your tape printer
direct to port or using the Windows print system. Enter P for direct
to port or W for Windows. What you see on the rest of the screen will
depend on what you have entered in this field.
If you will be using a tape receipt printer, set this to Y, otherwise
set it to N.
Click on or [Tab] to the field you wish to set and type in your desired setting.
Continue setting your options in this manner.
Select Ok when done to save your changes; or Cancel to abort and lose your changes.
(Click on any field below for context-sensitive help)
You must EXIT the system in order for any setup changes to
take effect. Additionally, if you are on a network and change shared
settings, the other users will not get those settings until they exit the system
as well.