- Introduction
- Setup
- Customers
- Inventory
- Employees
- Vendors
- Sales
- Purchasing
- Accounting
- Maintenance
- Reports
- Utilities
Page last updated: August 21, 2012
All rights reserved.
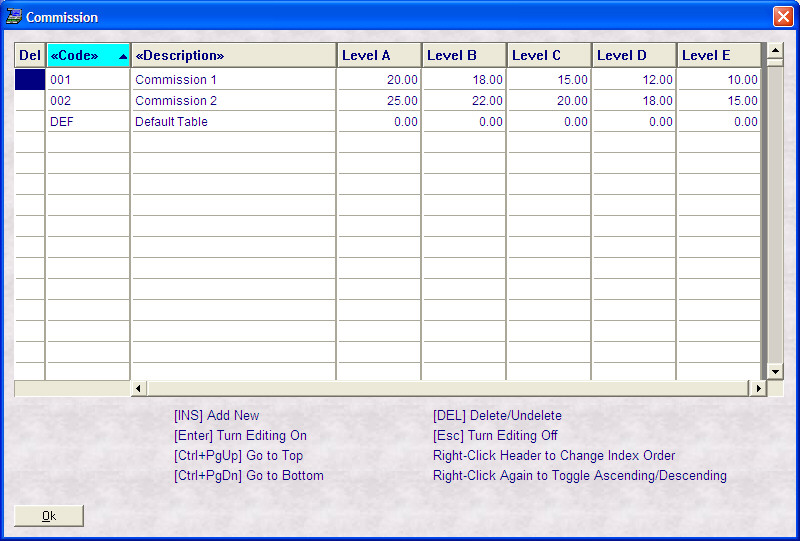
Editing Data FilesEdit Data Files allows you to directly access many of the tables which store your data. These tables may be used simply for lookup values (like register number or customer mail codes), or they may be actual transactional data. Select
System Lookup Tables include registers, departments, classes, and customer mail codes. Manage Data contains views into actual transactional data.
Adding a New Record Press [INS]. A new, blank record will be added for you. Type in your desired information and [Tab] or [Enter] to go to the next column. Press [Esc} when done. Editing an Existing Record To edit an existing record, double-click on the field, or use your arrow keys to highlight the field to edit and press [Enter]. You may [Tab] or [Enter] to go to the next field. Press [Esc] when done to turn edit mode off. Once you have turned edit mode on by selecting a field, it will remain on until you press [Esc]. This can make for quick and easy editing; however, you should exercise caution to ensure you do not edit a field unintentionally. Deleting a Record To delete a record, first make sure you are not in edit mode. Then click onto any field in the record you wish to delete and press [Del]. A large red X will appear in the leftmost column indicating the record has been marked for deletion. Deleting only marks a record for deletion. To permanently remove the record, you must pack the file. Until such time, you may undelete a previously deleted record by clicking onto any field in the deleted record and then pressing [Del] again. The large red X will now disappear. |