- Introduction
- Setup
- Customers
- Inventory
- Employees
- Vendors
- Sales
- Purchasing
- Accounting
- Maintenance
- Reports
- Utilities
Page last updated: August 21, 2012
All rights reserved.
Windows Printer SetupFrom your Windows Desktop, go to Start, Printers and Faxes.
Select Add Printer. Click Next until you see the following screen.
Select Local Printer and make sure that the option to automatically detect plug and play is unchecked. Click Next.
You will then need to select the port that your printer is connected to. Click on the drop down list to see the available ports.
Highlight the correct port and click Next. (LPT for a parallel printer; COM for a serial printer; USB for a USB printer.)
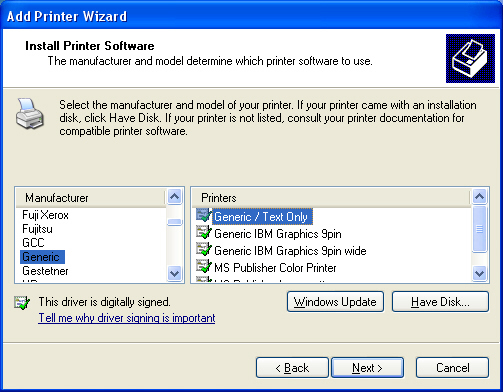
Scroll down in the manufacturer list on the left and highlight Generic. Then, in the printer list on the right, highlight Generic Text Only. Click Next.
If asked if you want to keep the existing driver or update it, select keep existing driver and click Next.
You will then be asked for the printer name. It will default to Generic / Text Only; however, you may give the printer a more descriptive name like Epson 300 or Samsung 350. Type in the name you want.
When asked if you want to use this printer as the default printer, select No then click Next.
If asked if you want to share the printer, select Do Not Share and click Next.
When asked if you want to print a test page, select Yes and click Next. Be sure that the test page prints. If it does not, you most likely have the wrong port selected. You can click Back and try another port.
Once you have successfully printed a test page, you are ready to setup your printer in your software. |